
Search Docs by Keyword
Command line access with Terminal (login nodes)
Introduction
This document describes how to get access to the cluster from the command line. Once you have that access you will want to go to the Running Jobs page to learn how to interact with the cluster.
Do not run your jobs or heavy applications such as MATLAB or Mathematica on the login server. Please use an interactive session or job for all applications and scripts beyond basic terminals, editors, etc. The login servers are a shared, multi-user resource. For graphical applications please use Open OnDemand.
Please note: If you did not request cluster access when signing up, you will not be able to log into the cluster or login node as you have no home directory. You will simply be asked for your password over and over. See this doc for how to add cluster access as well as additional groups.
A Note On Shells for Advanced Users: The FASRC cluster uses BASH for the global environment. If you wish to use an alternate shell, please be aware that many things will not work as expected and we do not support or troubleshoot shell issues. We strongly encourage you to stick with BASH as your cluster shell. The module system assumes you are using bash.
Training Session: Getting started on FASRC clusters with CLI (Command Line Interface)
Login Nodes
When you ssh to the cluster at login.rc.fas.harvard.edu you get connected to one of our login nodes. Login nodes are split between our Boston and Holyoke datacenters. If you want to target a specific datacenter you can specify either boslogin.rc.fas.harvard.edu (Boston) or holylogin.rc.fas.harvard.edu (Holyoke). You can also connect to a specific login node by connecting to a specific host name. Login nodes do not require VPN to access and are accessible worldwide.
Login nodes are your portal into the cluster and are a shared, multi-user resource. As mentioned above, they are not intended for production work but rather as a gateway. Users should submit jobs to the cluster for production work. For interactive work you should spawn an interactive job on a compute node. If you need graphical support we highly recommend using Open OnDemand.
We limit users to 1 core and 8GB of memory per session and a maximum of 5 sessions per user. Users abusing the login nodes may have their login sessions terminated. In order to clear out stale sessions the login nodes are rebooted as part of our monthly maintenance.
If you need more than 5 sessions, consider adapting your workflow to rely more on submitting batch jobs to the cluster rather than interactive sessions, as the cluster is best utilized when users submit work in an asynchronous fashion. Using Open OnDemand is also a good option as it gives you a traditional desktop on the cluster with ability to open multiple terminals on a dedicated compute node. There are also tools like screen or tmux which can allow one session to expand to multiple subscreens.
Connecting via SSH
For command line access to the cluster, connect to login.rc.fas.harvard.edu using SSH (Secure SHell). If you are running Linux or Mac OSX, simply open a terminal and type ssh USERNAME@login.rc.fas.harvard.edu, where USERNAME is the name you were assigned when you received your account (example: jharvard – but not jharvard@fasrc, that is only necessary for VPN). If you are on Windows, see below for SSH client options.
Once connected, enter the password you set after receiving your account confirmation email. When prompted for the Verification code, use the current 6-digit OpenAuth token code.
Note: If you entered a wrong password and are prompted to enter password and two-factor code again, wait for the two-factor code to refresh. Reusing the old code will result in error.
ssh jharvard@login.rc.fas.harvard.edu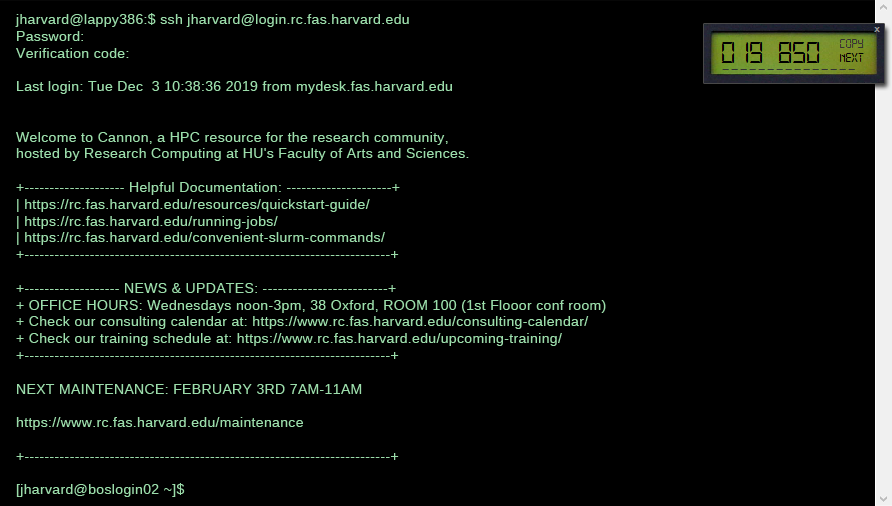
To avoid login issues, always supply your username in the ssh connection as above, since omitting this will cause your local login name at your terminal to be passed to the login nodes.
Passwordless SSH
Also known as ssh-key authentication, this method allows users to simply ssh to login node without requiring a password. Instead the user places their public ssh key in their authorized_keys file. With that ssh will rely on the key rather than asking you for a password each time you log in. Passwordless ssh is permitted to the Cannon login nodes from Harvard networks (including VPNs). If you are on an external network you are still required to provide Two Factor Authentication. If you are on FASSE, passwordless ssh is permitted from the FASSE VPN only. Below is a guide regarding how to setup the keys.
1. Key Pair
First, check if you already have a key generated or not on your local host. Look in ~/.ssh for key pairs, usually id_<cyrptographic_method> and id_<cryptographic_method>.pub (e.g. id_rsa, id_ed25519). For example:
jharvard@laptop:~/.ssh$ ls -l
total 180
-rw------- 1 jharvard jharvard 419 Mar 5 2025 id_ed25519
-rw------- 1 jharvard jharvard 104 Mar 5 2025 id_ed25519.pub
-rw------- 1 jharvard jharvard 86256 May 20 13:37 known_hosts
If you have existing keys and you want to use them, you can proceed to the next step. If you do not have one, you can generate one by running ssh-keygen. We highly recommend setting a passphrase to protect the key. ssh-agent can be used to hold the key after you have authenticated it so you only have to provide the passphrase once (most systems have this running by default).
2. Propagating the Key
The easiest method to propagate your key is to use ssh-copy-id which will copy the key into the authorized_keys file on the remote host. Simply do:
jharvard@laptop:~/$ ssh-copy-id jharvard@login.rc.fas.harvard.edu
/usr/bin/ssh-copy-id: INFO: Source of key(s) to be installed: "/home/jharvard/.ssh/id_ed25519.pub"
/usr/bin/ssh-copy-id: INFO: attempting to log in with the new key(s), to filter out any that are already installed
/usr/bin/ssh-copy-id: INFO: 1 key(s) remain to be installed -- if you are prompted now it is to install the new keys
(jharvard@login.rc.fas.harvard.edu) Password:
(jharvard@login.rc.fas.harvard.edu) VerificationCode:

Number of key(s) added: 1

Now try logging into the machine, with: "ssh 'jharvard@login.rc.fas.harvard.edu'"
and check to make sure that only the key(s) you wanted were added.
You can then check on the cluster at ~/.ssh/authorized_keys to see if your key is there. You can also prove it by just sshing and seeing if it asks you for a password, if it does not you are all set.
Alternatively you can copy your public key from your local machine and paste it into the ~/.ssh/authorized_keys on the remote host. That will also enable passwordless ssh.
Please note that you should never share your ssh private key (the file without the .pub ending) with anyone. The public key (the one with .pub ending) can be shared as you need. In addition make sure that your .ssh directory and the files there in is locked down such that only your user can access it.
SSH Clients
MAC/LINUX/UNIX
If you’re using a Mac, the built-in Terminal application (in Applications -> Utilities) is very good, though there are replacements available (e.g. iTerm2).
On Linux distributions, a terminal application is provided by default. For Linux users looking for the iTerm2-like experience, Tilix is popular option.
WINDOWS Clients
If you’re using Windows, you will need to decide what tool to use to SSH to the cluster. Each app behaves differently, but includes some way to enter the server (login.rc.fas.harvard.edu) and select a protocol (SSH). Since there’s no one app and many are used by our community, some suggestions follow.
Terminal
Windows 10+ has ssh built into its standard terminal.
Windows Subsystem for Linux (WSL)
Windows 10+ has the ability to start a miniature Linux environment using your favorite flavor of Linux. From the environment you can use all the normal Linux tools, including ssh. See the Windows Subsystem for Linux documentation for more.
ssh-agent
ssh-agent is not on by default for WSL instances. To have it automatically start add the following lines to the bottom of your ~/.bashrc:
# Automatically start the SSH agent. Keys will be added automatically on first use because of the config in ~/.ssh/config
if [ -z "$SSH_AUTH_SOCK" ]; then
  eval $(ssh-agent -s) > /dev/null
fi
Then in your ~/.ssh/config add:
# Automatically add keys to the SSH agent.
Host *
  AddKeysToAgent yes
  IdentityFile ~/.ssh/id_ed25519
  IdentityFile ~/.ssh/perhaps_you_have_another_key_you_want_to_add
  # You can add as many keys as you want. They will only be added to the agent in that WSL2 terminal and only on first use.
After this restart the WSL instance and ssh-agent will be running. It will still ask you for the ssh-key passphrase once but then will not ask again for the rest of the session.
PuTTY
PuTTy is a commonly used terminal tool. After a very simple download and install process, just run PuTTY and enter login.rc.fas.harvard.edu in the Host Name box. Just click the Open button and you will get the familiar password and verification code prompts. PuTTY also supports basic X11 forwarding.
Git BASH
For Windows 10 users Git BASH (part of Git for Windows) is available. It brings not aonly a Git interface, but BASH shell intergration to Windows. You can find more info and download it from gitforwindows.org
MobaXterm
MobaXterm provides numerous remote connection types, including SSH and X11. You can find out more and download it from mobaxterm.mobatek.net There is a free and a paid version and MobaXterm supports X11 forwarding.
XMing (standalone)
XMing is an X11/X Windows application and is a bit more complex. But it’s mentioned here as we do have users who use it for connecting to the cluster. You can find more info at www.straightrunning.com