Search Docs by Keyword
Virtual Desktop Apps
To access the Open OnDemand dashboard, available on both Cannon and FASSE, you must be logged into the FASRC VPN and have cluster access, which you can request via the FASRC Portal.
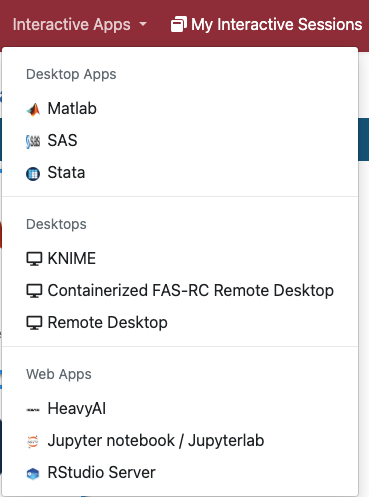
The Interactive Apps currently supported on the Open OnDemand include:
- Remote Desktop: This app schedules a Remote Desktop session on a compute nodeand opens a new tab to connect to it. You can open multiple applications at the same time. Also see How to open software on Remote Desktop.
- Jupyter notebook: The app schedules a Jupyter Notebook session on a compute node and opens a new tab to connect to it. You can open multiple Jupyter Notebooks, but you cannot open other apps.
- RStudio Server: The app schedules an RStudio Server session on a compute node and opens a new tab to connect to it.
- Matlab: The app schedules a Matlab session on a compute node and opens a new tab to connect to it. You can run single-node codes in parallel using the parallel pool. See our Github User_Codes page for an Matlab parallel example on Open OnDemand.
- Other: Additionally, we offer SAS, Stata, and KNIME. Also, see How to open software on Remote Desktop for apps not listed here.
Remote Desktop
The Remote Desktop app will schedule a job on a compute node, start a vnc server (TurboVNC), and provide a link to connect to it via the browser-based app noVNC. No client is needed to connect to it, but if instead of using the web based client you prefer to use a traditional VNC client to connect to your session, please see Using a VNC Client to Connect at the bottom of this page. To launch the session:
- Go to the Cannon or FASSE dashboard
- In the “Interactive Apps” menu, select the “Remote Desktop”
- Fill in the following form. In the form you will be able to select:
- partition – To see the available resources of each partition, refer to the Slurm Partitions documentation.
- memory
- number of cores
- number of GPUs – use this only if selecting a GPU-enabled partition, see Slurm Partitions documentation.
- allocated time
- (optional) Selecting the checkbox “Custom Desktop Folder” will create a job-specific desktop
- (optional) Email for status notification: enter a valid email to be notified when the job starts. Also, select the checkbox.
- Once you have completed your sections, press the “Launch” button
- Allow a few seconds for the system to process your submission form, and you will be redirected to the “My Interactive Sessions” page
- Click on the blue button “Launch Remote Desktop“. A new tab will open with the Remote Desktop session.
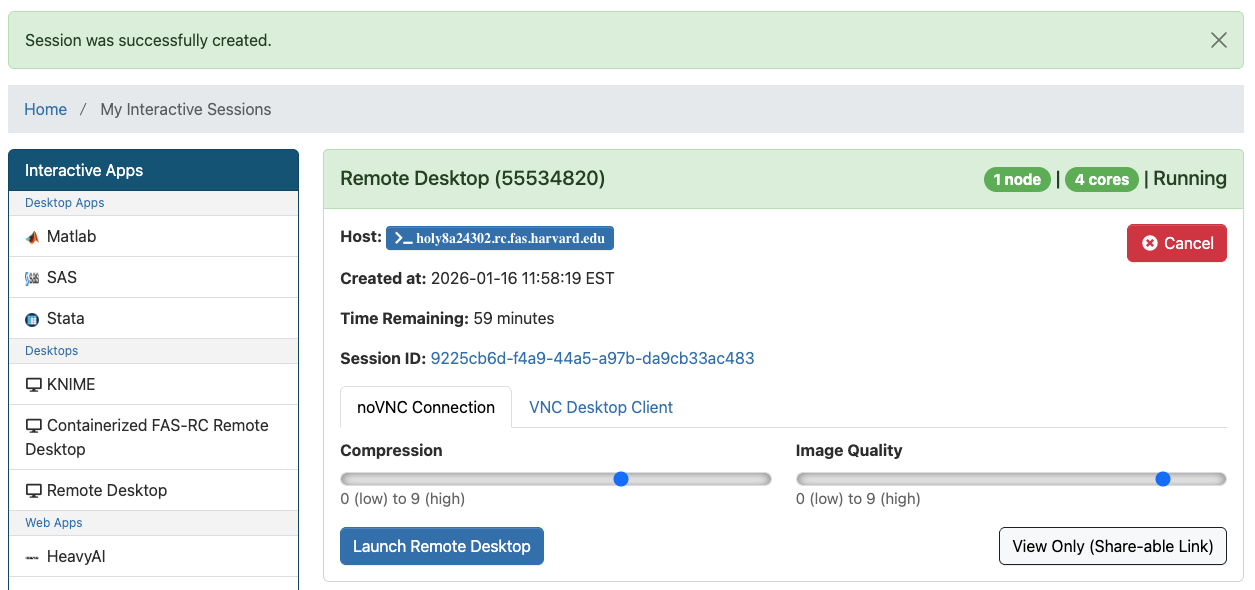
- Once the Remote Desktop starts, you can open a terminal, load the modules you need, and start the software from the command line — see Remote Desktop: How to open software for more details.
- When you are done running your computation, you can stop the job using the “Delete” red button in the section for that particular job in the “My Interactive Sessions” page.
Performance and usability within a remote desktop type session
- When running a Remote Desktop or app that uses the desktop (ex. Matlab), the noVNC client does not support sharing clipboard and direct “Copy and paste” between your computer and the remote session in noVNC. noVNC provides a “staging clipboard” that you can use to copy to and from the remote session. Copy things to that clipboard first, and then you can copy to your remote session.

- The default resolution of the remote session is 1024×768 and by default the resolution will not adjust to client display size. That is to avoid to resize the remote server to very large resolution in case you are connected to a large screen external display, and avoid performance degradation. If you chose to, you can rescale the remote clicking on the setting “wheel” and select “scaling mode = remote resizing”
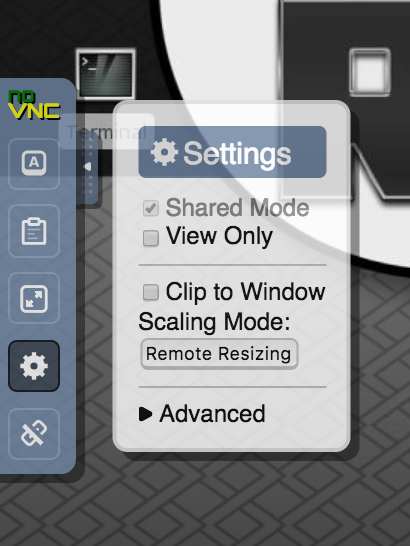
- The noVNC web client is very convenient as it does not require you to install a client to connect, but it does not support all features in terms of compression and performance optimization that TurboVNC client or another client would. If instead of using the web based client you prefer to use a traditional VNC client to connect to your session, please see later in this doc.
- If you close the noVNC tab or the connection times out due to long inactivity, you will be always able to reconnect to your session clicking again on the “Launch noVNC in new Tab” in the “My Interactive Sessions” page . Your job is controlled by Slurm and will keep running until the allocated time, or until you cancel the job.
- If you want to terminate your job and your Remote Desktop session, you can simply click the “Delete” button on the “My Interactive Sessions” tab in the section corresponding to that particular job.
Jupyter Notebook
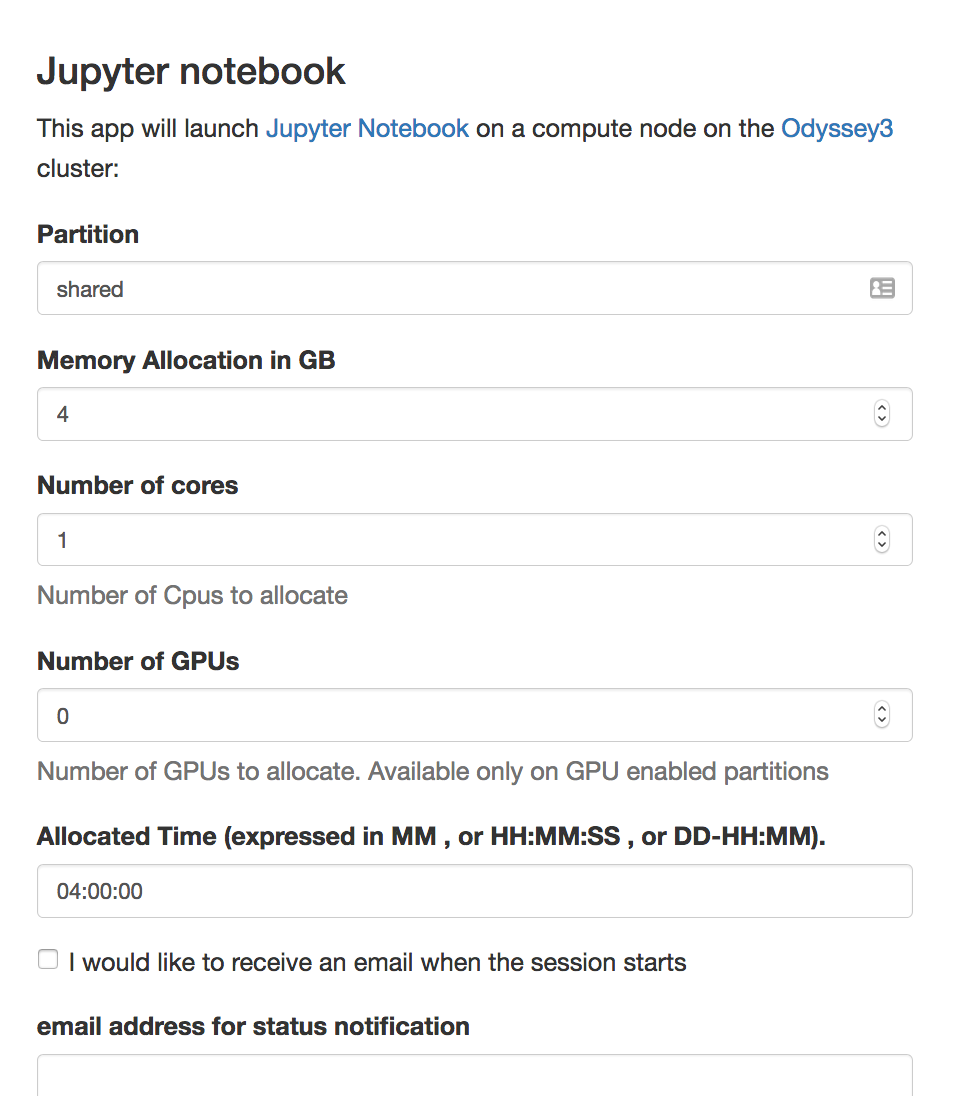
This App allows you to submit a job which starts a Jupyter notebook on a compute node and provides a link to connect to it on a new browser tab. To launch the notebook, please select the “Jupyter notebook” entry from the “Interactive Apps” menu, and fill the form. In the form you will be able to select :
- Go to the Cannon or FASSE dashboard
- In the “Interactive Apps” menu, select the “Jupyter notebook/ Jupyterlab”
- Fill in the following form. In the form, you will be able to select:
- partition – to see the available resources of each partition, refer to the Slurm Partitions documentation.
- memory
- number of cores
- number of GPUs – use this only if selecting a GPU-enabled partition, see Slurm Partitions documentation.
- allocated time
- (optional) Working Directory: enter a path if you would like to start Jupyter in a diferent directory (e.g.
/n/netscratch/jharvard_lab) - (optional) Extra Modules: enter modules necessary to run your code (e.g.
cuda/12.9.1-fasrc01) - (optional) Reservation: Use this if you have an active reservation and would like to use it to run your job
- (optional) Additional slurm options: must use slurm’s long format option (e.g.,
--nodelist=holy7c24502instead of-w holy7c24502) - (optional) Slurm Account: specify which lab account you want to charge in terms of FairShare for this particular job. If you are only affiliated with one lab, please ignore that entry, as it will default to your primary group.
- (optional) Email for status notification: enter a valid email to be notified when the job starts. Also, select the checkbox.
- Press the “Launch” button
- Allow a few seconds for the system to process your submission form, and you will be redirected to the “My Interactive Sessions” page
- Click on the blue button “Connect to Jupyter“. A new tab will open with the Jupyter Notebook session

- When you are done running your computation, you can stop the job using the “Delete” red button in the section for that particular job in the “My Interactive Sessions” page.
How do I access the Python and R kernels installed in my conda environments?
Jupyter can see your local mamba/conda environments that include the ipykernel and nb_conda_kernels packages (note that Jupyter calls conda/mamba environments “kernels”). To change to a specific conda/mamba environment:
- Open a Jupyter Notebook
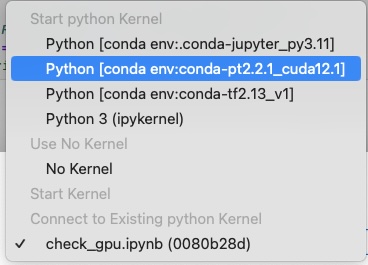
- On the top right corner, click “Python 3 (ipykernel)”. If you already have a kernel selected, it may be a different name
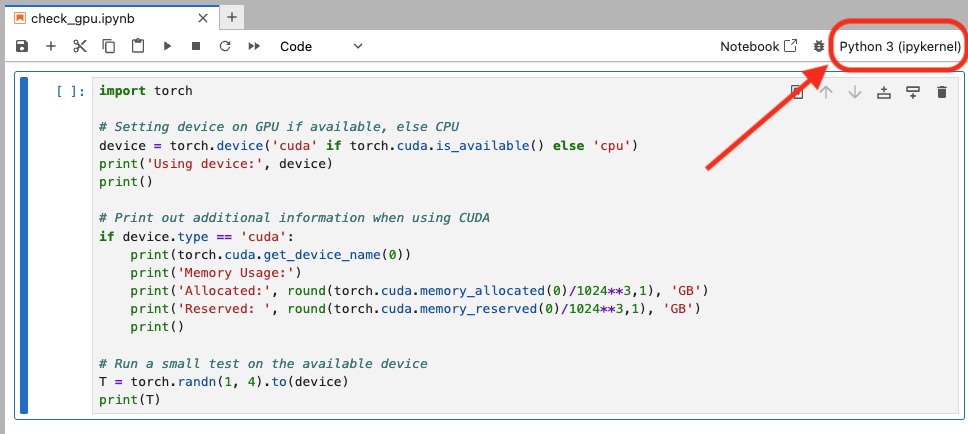
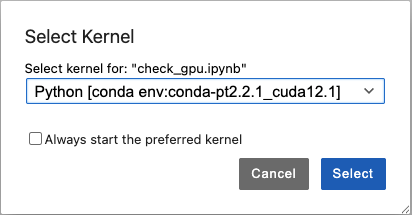
- Choose the kernel
- Click the “Select” blue button
- At the top right corner, you will see the selected kernel
Warning: When sharing conda environment, we highly recommend that only one person install/uninstall/update packages because the environment may break if multiple users change the conda environment.
When a conda environment is created, its path is added to the the file ~/.conda/environments.txt. People that would like to use a conda environment created by someone else need to add the conda environment path to ~/.conda/environments.txt.
For example, jharvard creates an environment in a shared lab space and installs ipykernel:
# request interactive node
[jharvard@boslogin01 conda_envs]$ salloc -p test --time=1:00:00 --mem=4000

# load modules
[jharvard@holy7c24604 conda_envs]$ module load Anaconda3/2020.11

# create shared conda environment
[jharvard@holy7c24604 conda_envs]$ conda create --prefix /n/holylabs/jharvard_lab/Lab/conda_envs/my_shared_env python=3.10

# launch conda environment and install ipykernel
[jharvard@holy7c24604 conda_envs]$ source activate /n/holylabs/jharvard_lab/Lab/conda_envs/my_shared_env
(/n/holylabs/jharvard_lab/Lab/conda_envs/my_shared_env) [jharvard@holy7c24604 conda_envs]$ conda install ipykernel

# environment path is automatically added to ~/.conda/environments.txt
(/n/holylabs/jharvard_lab/Lab/conda_envs/my_shared_env) [jharvard@holy7c24604 conda_envs]$ cat ~/.conda/environments.txt
/n/holylabs/jharvard_lab/Lab/conda_envs/my_shared_env
Now, user1 has to add the same environment path to their ~/.conda/environments.txt file:
[user1@boslogin01 ~]$ echo "/n/holylabs/jharvard_lab/Lab/conda_envs/my_shared_env" >> ~/.conda/environments.txt
[user1@boslogin01 ~]$ cat ~/.conda/environments.txt
/n/holylabs/jharvard_lab/Lab/conda_envs/my_shared_env
Now, user1 will be able to select my_shared_env in Jupyter notebook VDI app as explained above.
Troubleshooting
I don’t see my conda/mamba environment in Jupyter
If you don’t see your conda/mamba environment in the list, you must install the packages ipykernel and nb_conda_kernels packages in your environment. For step-by-step instructions, see Use mamba environment in Jupyter Notebooks documentation.
After those packages are installed in your conda/mamba environment, you should see the environment in new Jupyter sessions.
I no longer can use my Python packages in Jupyter
If you were affected by the Jupyter app update in Jan/Feb 2026, you may have inadvertently installed packages in ~/.local. FASRC discourages the installation of Python packages in ~/.local because pip, mamba, and conda cannot track package dependencies properly in ~/.local.
We recommend that you create a new mamba/conda environment and install the packages the Python packages that you need. To do so, follow the instructions in the Python Package Installation documentation:
- Section “Environments“
- Section “Use mamba environment in Jupyter Notebooks“
Jupyter notebook VDI session is terminated right after it starts
This problem is common when there is a conda initialize section in your .bashrc file located in your home directory (more about .bashrc). The conda initialize section was added when, at some point, you used the command conda init. We strongly discourage the use of conda init. Instead use source activate environment_name, for more details, refer to our Python (Anaconda) page.
To solve this problem, delete or comment out the conda initialize section of your .bashrc and create a new Jupyter notebook VDI session.
If this problem occurs, you may see an error, jupyter: command not found, in
~/.fasrcood/data/sys/dashboard/batch_connect/sys/Jupyter/output/<sessionID>/output.log
On FASSE:
~/.fasseood/data/sys/dashboard/batch_connect/sys/Jupyter/output/<sessionID>/output.log
To solve this problem, delete the line auto_activate_base: false in the file ~/.condarc.
Example Jupyter Lab Notebooks
Example Jupyter and R notebooks demonstrating machine learning techniques on the classic Iris dataset. These notebooks are used in FASRC training sessions.
- Classification pipeline in Python.ipynb: End-to-end classification pipeline using scikit-learn and pandas. Covers data exploration, visualization with PCA, feature scaling, feature selection, and training a logistic regression model.
- Data_Classification.ipynb: K-Nearest Neighbors (KNN) classification example. Demonstrates train/test splitting, feature scaling, model training, and evaluation with confusion matrices.
- Data_Clustering.ipynb: K-Means clustering example. Shows unsupervised clustering on the Iris dataset and compares predicted clusters to actual labels.
- Data_Exploration.Rmd: R Markdown notebook for data exploration. Demonstrates loading data, train/test splitting, summary statistics, and basic visualizations in R.
- iris.data: The Iris dataset used by the notebooks.
Matlab
This App allows you to submit a job which starts a Matlab session on a compute node and provides a link to connect to it on a new browser tab. To launch the notebook, select the “Matlab” entry from the “Interactive Apps” menu, and fill in the following form.
– partition (see partitions page for core, memory, and time limits on public partitions)
– memory allocated for the job
– number of cores
– number of hours
Refer to our Github User_Codes for an example on how to run a parallel code on VDI.
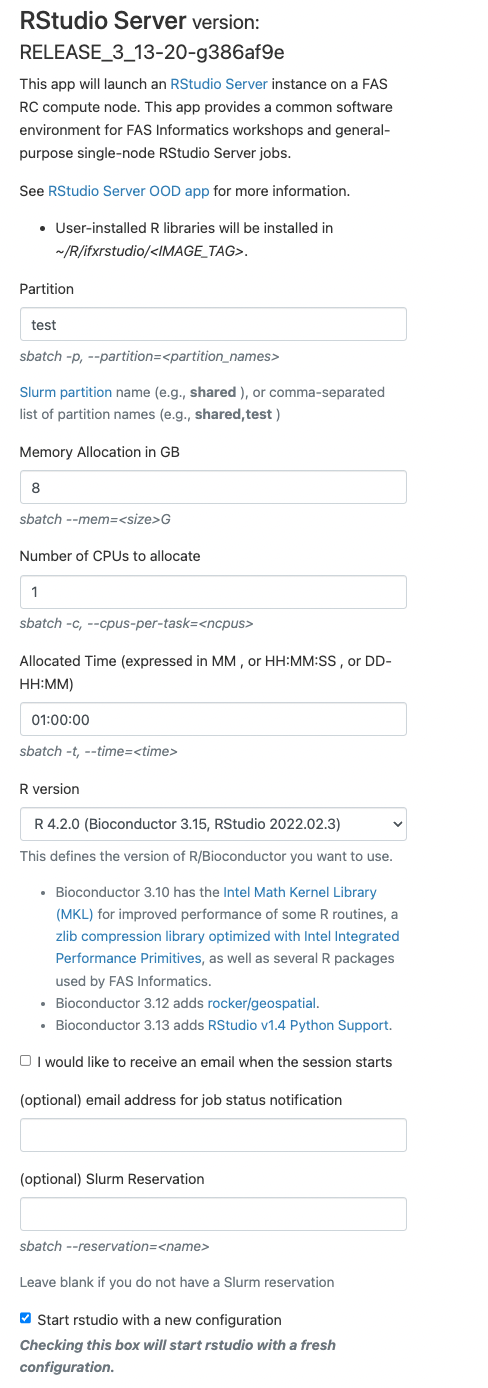
RStudio Server
This app allows you to submit a job which starts a RStudio Server session on a compute node and provides a link to connect to it on a new browser tab. To launch the notebook, select the “RStudio Server” entry from the “Interactive Apps” menu, and fill in the following form.
– partition (see partitions page for core, memory, and time limits on public partitions)
– memory allocated for the job
– number of cores
– number of hours
You can then select the version of R you want to run in your Rsession in RStudio.
If you want to be notified by email when the job starts select the checkbox and include a valid email address in the form. The “Slurm Account” can be use to specify which lab account you want to charge in terms of FairShare for this particular job. If you only are affiliated to one lab you can ignore that entry as it will default to your primary group.
When you made your selection press the “Launch” button. Allow a few seconds for the system to process your submission form, and you will be redirected to the “My Interactive Sessions” page.
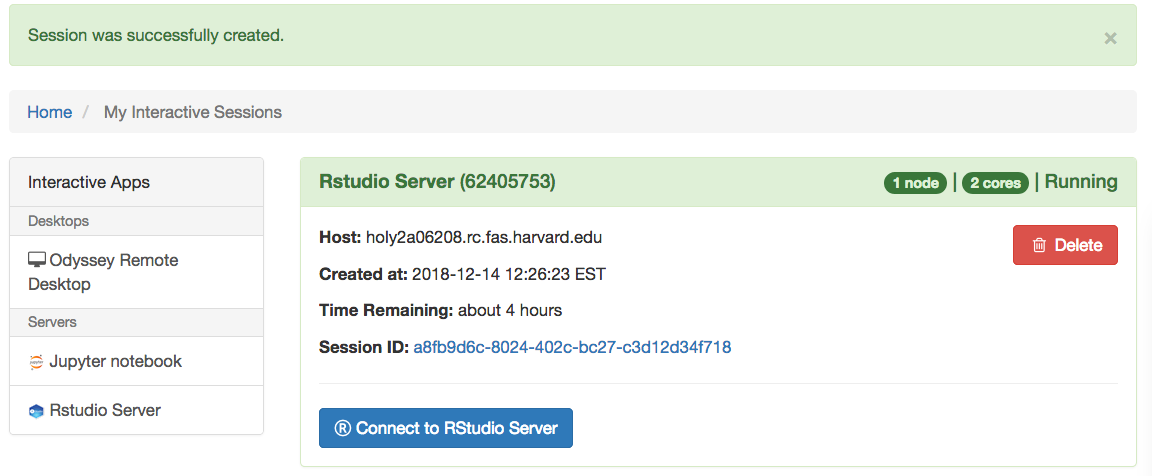
You will be able to use the “Connect to RStudio Server” button to open the RStudio session in a new tab on your browser.
Note: When you are done running your computation you can delete the job using the “Delete” button in the section related to that particular job in the “My Interactive Sessions” page.
FASRC also has RStudio Desktop that can be launched from the Remote Desktop app. See the following docs for more information
- How to launch RStudio Desktop
- RStudio Server vs. RStudio Desktop
Sign in to RStudio error
In very rare instances, you may come across a prompt to sign in to RStudio. If you are running RStudio Server and get a sign in prompt asking for Username and Password:
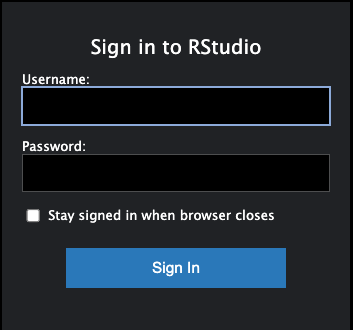
Go to the Open OnDemand dashboard (Cannon, FASSE). Then click on “Interactive Session” on the top menu and then click on the button “Connect to RStudio Server”. This will reopen the RStudio Server session.
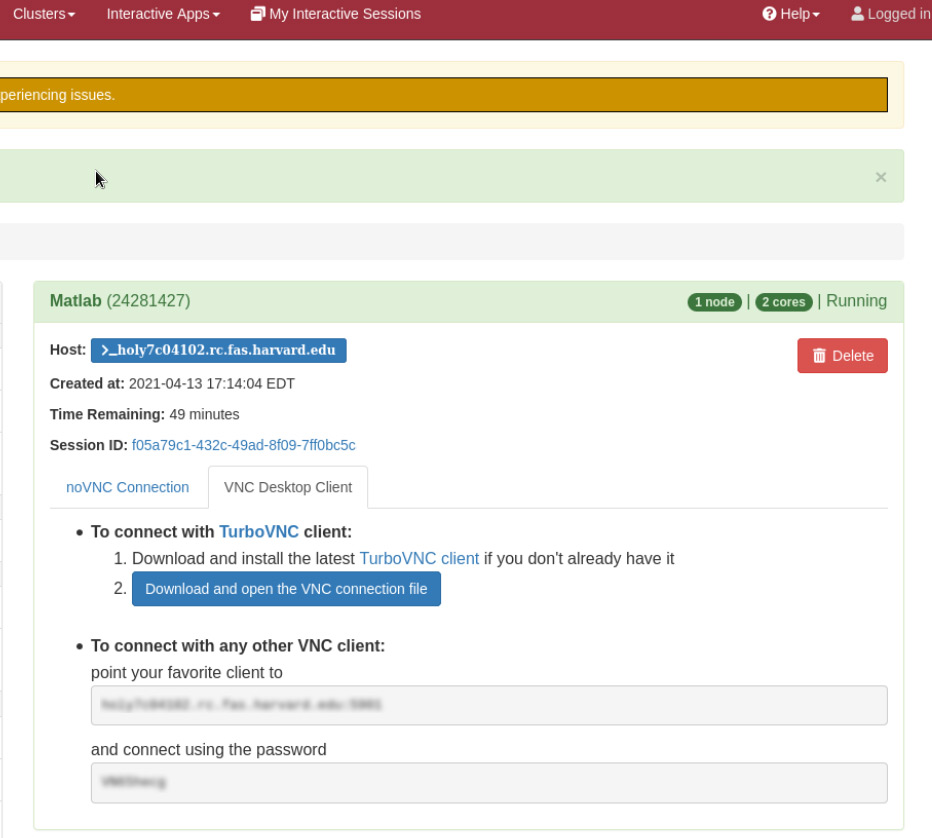
Using a VNC Client to Connect
No client is needed to connect to to a session, but if instead of using the web based client you prefer to use a traditional VNC client (we highly recommend TurboVNC) to connect to your session, please click on My Interactive Sessions and the VNC Desktop Client tab for instructions.
Bookmarkable Links
- 1 Remote Desktop
- 2 Jupyter Notebook
- 2.1 How do I access the Python and R kernels installed in my conda environments?
- 2.2 How do I access a conda environment located in a lab share from Jupyter notebook app?
- 2.3 Can I control my conda environment from the Jupyter notebook page?
- 2.4 How do I load additional modules that my kernels need?
- 2.5 Troubleshooting
- 2.6 Example Jupyter Lab Notebooks
- 3 Matlab
- 4 RStudio Server
- 5 Using a VNC Client to Connect