Search Docs by Keyword
IQSS FASRC and FASSE Quick Start Guide v2
Please note: Sharing of accounts is not allowed and in direct violation of security policies. Shared accounts are subject to being immediately disabled and the PI/faculty member sponsoring the account notified.
- To access Research Computing (RC) resources, you must have an active appointment or enrollment at Harvard University or be an External Collaborator.
- A Harvard PI who has a lab group on the FASRC or FASSE cluster must sponsor your access.
- Faculty and staff at the following Harvard Schools qualify for RC accounts:
- Faculty of Arts and Sciences (FAS)
- Rowland Institute
- School of Engineering and Applies Sciences (SEAS)
- Harvard T.H. Chan School of Public Health (HCSPH)
- Institute for Quantitative Social Sciences (IQSS)
- Graduate School of Design (GSD)
- Graduate School of Education (GSE)
- Harvard Kennedy School of Government (HKS)
- Harvard Business School (HBS): before signing up with FASRC any HBS faculty applicants need to first check with HBS research computing to determine their needs.
- For all other schools, please see our Other Institutions page for information about other Harvard Clusters that may be available to you.
- If you are signing up for an account for Harvard Center for Biological Imaging (HCBI) access, please see the HCBI requirements page before proceeding. This is especially important if you are NOT an FAS, SEAS or HCSPH affiliate.
- Your usage of Research Computing Resources may be subject to charges. Please see our billing FAQ.
- FAS Research Computing (FASRC) accounts are separate from other Harvard systems, including HarvardKey. You must set up an FASRC account with 2-Factor authentication to have access to the FASRC or FASSE clusters, Spinal instrument signup, MiniLIMS and IggyBase LIMS systems, and RC VPN realms.
- You may have only one FASRC account. If you have an existing account or pending account request, do not sign up again.
- To add a group to your existing account, see Add Grants.
- If you need to add instrument access, see the SPINAL instrument sign-up documentation.
- To modify your existing account, please contact FASRC.
- Since some of the services you need require payment, training, or both, you will also be asked to provide sponsorship information: PI name, Approver name, and Department.
- Due to the shared nature of the FASRC cluster and its associated storage systems, FERPA blocks for specific individual information cannot be accommodated within the FASRC cluster and its associated systems. Information such as, but not limited to, name, username, and lab affiliation may be available to other cluster users. Please contact FASRC if you have questions or concerns.
- Once your account has been approved and created, you will receive a confirmation email from FASRC. At this point you must set your password and OpenAuth 2-Factor Authentication.
You will use the Account Request Tool at https://portal.rc.fas.harvard.edu/request/account/new to sign up. Detailed instructions can be found below.
If you will be using the cluster, you MUST select “FASRC cluster access, including Slurm job submission” in the Services tab on the third page.
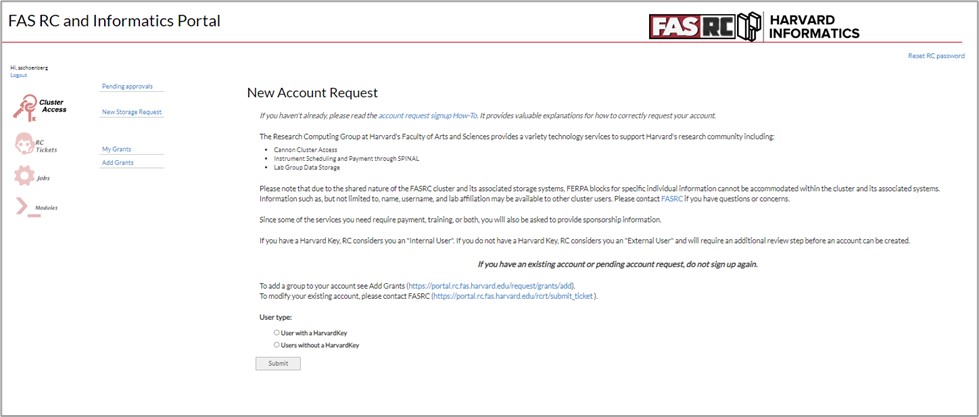
- Select “User with a HarvardKey” if you have a HarvardKey; otherwise choose “User without a HarvardKey.” Non-HarvardKey users will receive additional review by RC staff after PI approval.
- Click “Submit”

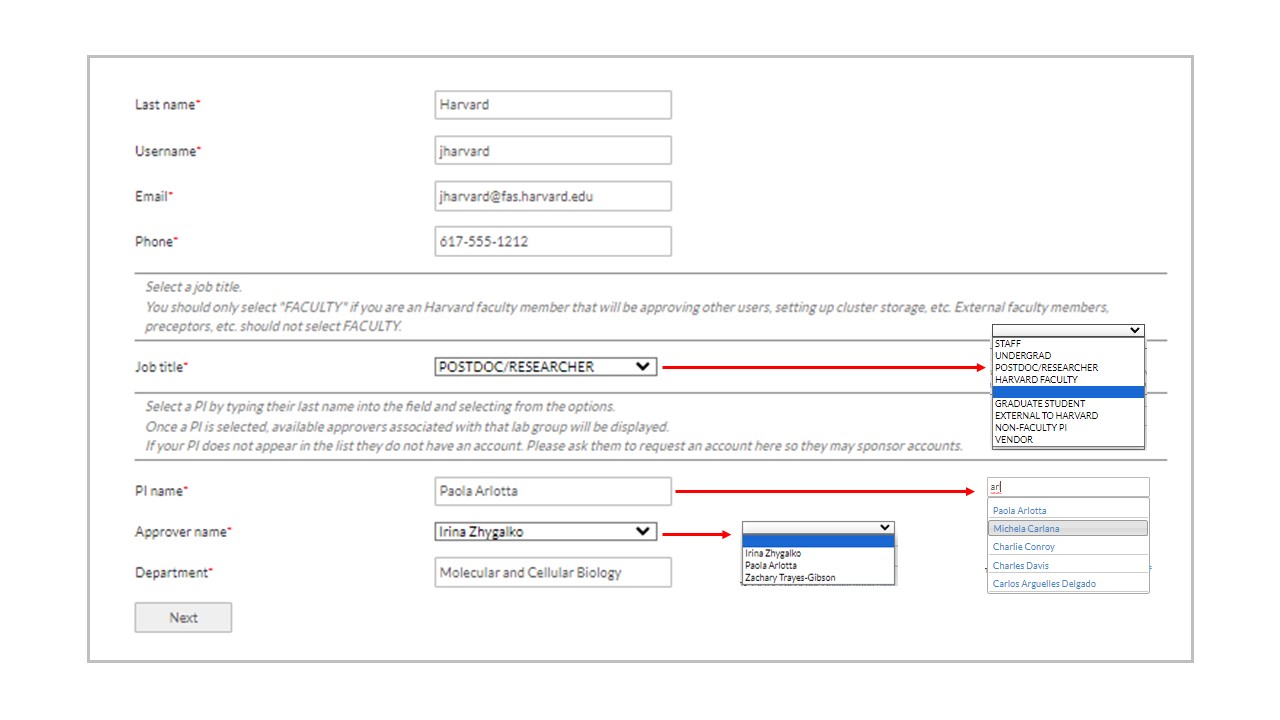
- Fill in your First Name and Last Name.
- Choose a username for yourself.
- If you are a HarvardKey user, use your HarvardKey email address. Otherwise use any valid email address.
- Enter a phone number where RC staff can reach you.
- Select the Job Title that best describes your position at Harvard.
- If you are outside Harvard, always choose “EXTERNAL.”
- Only choose “HARVARD FACULTY” if you are a Harvard Faculty member who is a PI and not requesting access as a member of someone else’s group.
- For all Job Titles except PI, a box to enter your PI name and Approver name will appear on the screen.
- Start typing the LAST name of your PI in the list and you will see a list of PIs populated as you type. When you select your PI, the list of approvers is populated. This will either be the PI, a list of designated lab managers, or both.
- Select the appropriate approver name.
- Enter your department name.
- Click Next.

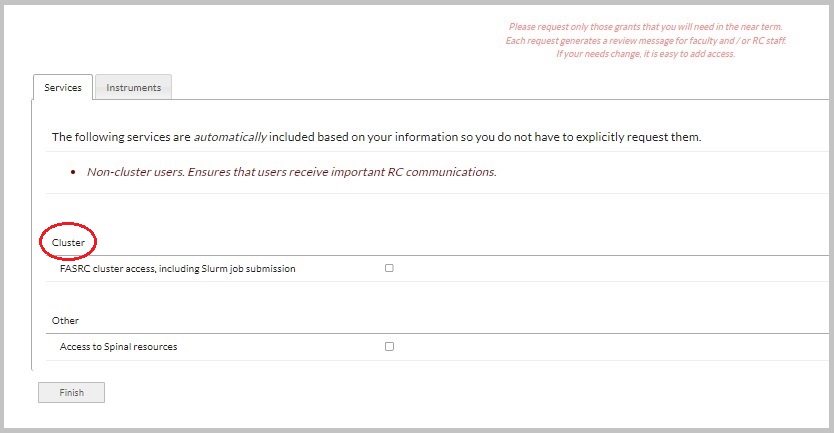
- If you will be using the cluster, you MUST select “FASRC cluster access, including Slurm job submission” in the Services tab on the third page.
- Please only request services or instruments you need right now. You can always request a service or instrument later.
- Click the “Finish” button to Submit your completed New Account request once you have selected your services and instruments.
- Once your account has been approved and created, you will receive a confirmation email from FASRC. At this point you must set your password and OpenAuth 2-Factor Authentication.
- If you will be using the cluster, you MUST select “FASRC cluster access, including Slurm job submission.”
- If you will be using the FASSE cluster, you MUST select at least one Service.
- Select “Access to Spinal resources” if you will be using instruments managed by Spinal, such as the Bauer Core Illumina sequences and the Center of Biological Imaging Lightsheet microscopes.

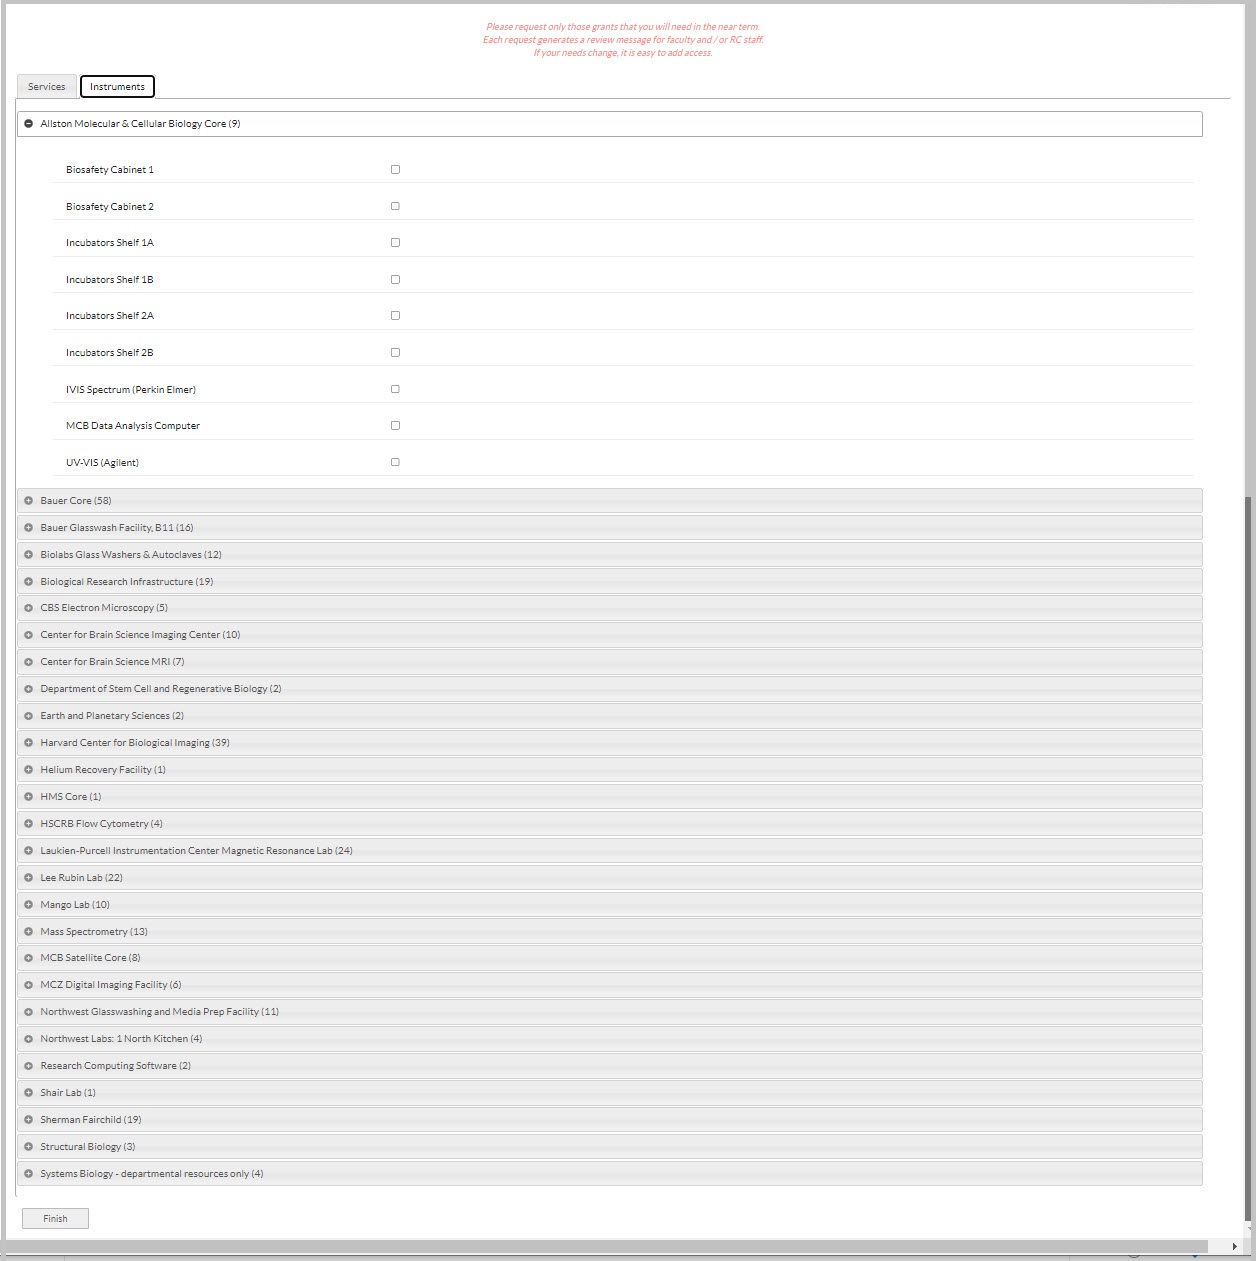
- Click on the plus sign to see a list of instruments under each category.
- Select the instruments you need.

Note: This step can only be done once you have received an email that your FASRC account has been created.
To set or reset your FASRC password, browse to https://portal.rc.fas.harvard.edu/p3/pwreset/ and do the following:
- Enter the email address you signed up with and click Submit.
- The system will then send you an email with a one-time link.
- Click that link to be taken to a form that will allow you to enter a new password.
- Note: You must click the link within 30 minutes of your request or it will expire and you will need to start the password request process again at https://portal.rc.fas.harvard.edu/p3/pwreset/.
- Password Requirements:
-
- Passwords must be at least 12 characters in length.
- Passwords must contain both uppercase and lowercase letters.
- Passwords must contain both a number and a special character (!@#$%^&*).
- Passwords must not contain a portion of your name or username.
FASRC accounts are protected by protected by 2-factor authentication — access requires providing a normal password and a time-dependent “verification code.” We use a package, built on open standards, that we call OpenAuth to provide 2-factor authentication.
- Go to https://two-factor.rc.fas.harvard.edu/
- Enter your username and password. Your username is NOT your email address. It IS the username you chose when you signed up, and that you can also find in the confirmation email you received when your account was set up. For example, jharvard.
- Select Sign In. An email will be sent to the email address you signed up with that will contain a link that will be valid for 24 hours.
- Click on the link. You will see the following message:

- You will also see information to enable you to set up your mobile device or desktop application, including
-
- QR code containing your secret token to use with mobile devices.
- Customized application that will have your username in it, for example jharvard-openauth.zip.
- String of letters and numbers that is your secret token.
- Recommended Method: Use 1Password Manager. See detailed instructions below.
- If you choose to use your mobile device, you will scan the QR code displayed on the screen to input your secret code. See detailed instructions below.
- If you choose to use a desktop application, you can either click on the customized application link displayed on the screen or set up your own installation and copy and enter the secret token displayed on the screen. See detailed instructions below.
- If you don't already have 1Password, go to https://huit.harvard.edu/password-manager, select "Get started," and follow the instructions to download the 1Password application.
- Login to https://harvard.1password.com.
You will see a screen that looks like the following:
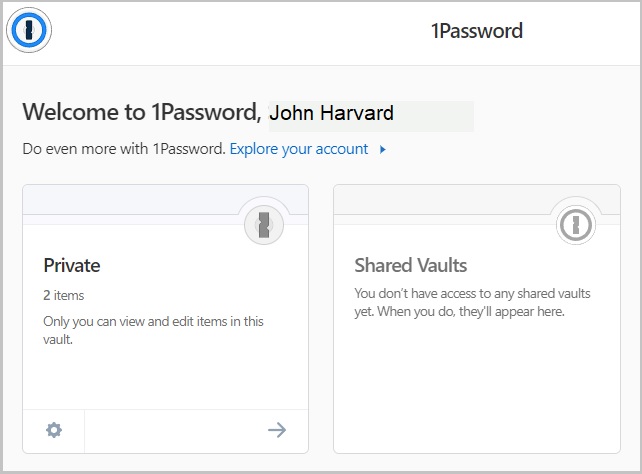
- Under Private click on the + sign to open up a new entry and choose “Password” from the dropdown box.

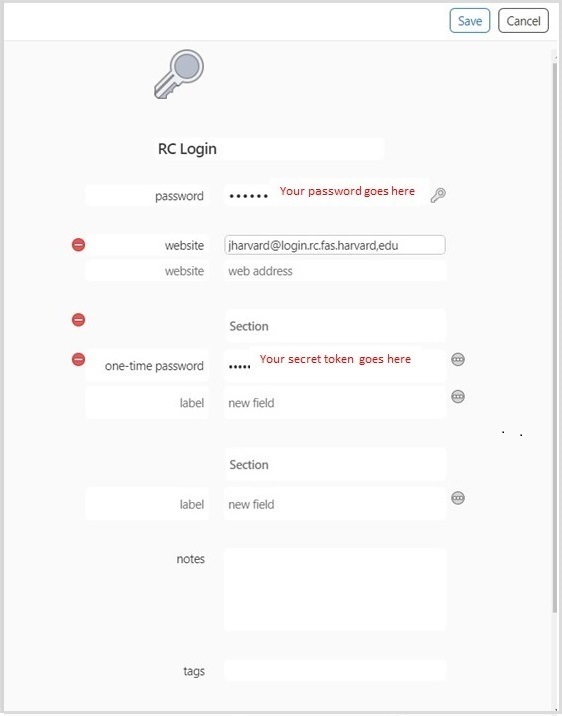
- Give your entry any title.
- Under password, enter your RC password.
- Under website, enter your username@login.rc.fas.harvard.edu, for example, jharvard@login.rc.fas.harvard.edu.
- Under Label click on the three dots and choose “one-time password.” In the box next to it paste in your secret token.
- To get your 2FA one-time code when needed, click on the
 icon at the top of your screen:
 This will bring up a dialog box that will show your one-time code:

- Download the Google-Authenticator or DuoMobile app from the Apple App Storeor Google Play.
- Open the app and select the + symbol
- Select the button to scan in the code rather than enter it manually.
- Point your device's camera at the QR code on the screen
- Note: if you have an iOS or Android device without a camera or have a broken camera, you will need to enter your secret token manually.
- Download java from at http://www.java.com/or through your system's software package manager. You must have version 1.6 or newer.
- Download the file jharvard-openauth.zip [which will have your username instead of jharvard] and unzip it in a convenient location that you will be able to find later.
- There is nothing to install — each time you need to launch the application, just double-click JAuth.jar.
- If you prefer launching from the command-line, there are also the scripts jharvard-openauth.sh (if you use a Mac or Linux) and jhavard-openauth.bat (if you use Windows) [again, with your username instead of jharvard].
- If you don't already have it, download the VPN client, Cisco AnyConnect at
https://summer1-rc-vpn-gw.rc.fas.harvard.edu/+CSCOE+/logon.html#form_title_text.
- Enter your username@fasrc, for example jharvard@fasrc.
- Enter your password.
- Enter your 2-factor authentication code from your mobile app or from the desktop app.
- Select Login and you will be sent to a website to download Cisco AnyConnect.
- Follow the instructions to download and install the Cisco AnyConnect.
Note: in order to connect to the FASRC Cluster you must use the FASRC VPN. It is different from the VPN you would use to connect to the FASSE Cluster and different from the HUIT VPN.
- Open the VPN app.
- Select Connect.

- Enter your username@fasrc, for example, jharvard@fasrc.
- Enter your password.
- In the box next to “Second Password” enter your 2-factor authentication code from your mobile app or from the desktop app.
- Select OK.
- You are now ready to connect to the connect to the cluster using either a Command Line Interface or a Visual Interface.

- If you are using Linux or MacOSX, open a terminal. If you are on Windows, open a Command Prompt by clicking on the search icon and typing “Command Prompt.”
- Type the command ssh username@login.rc.fas.harvard.edu, for example ssh jharvard@login.rc.fas.harvard.edu.
- In the terminal window, login as username without @fasrc, for example jharvard.
- Enter your password at the prompt.
- Enter your 2-Factor identification code when prompted for VerificationCode.

- Go to https://rcood.rc.fas.harvard.edu.
- Enter your FASRC username, without the “@fasrc”, for example, jharvard.
- Enter your FASRC password.

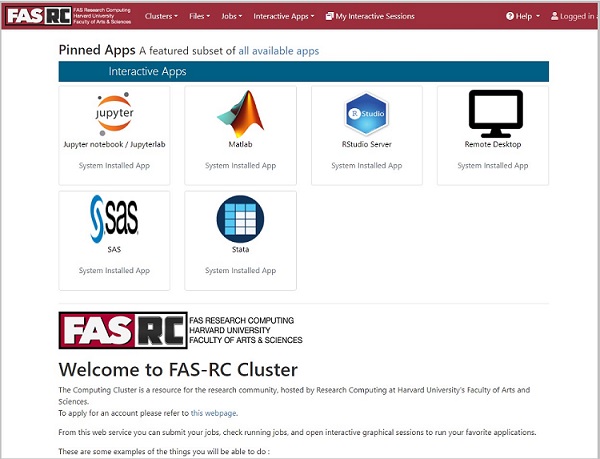
- Once you are logged in, this is what you will see:
Note: in order to connect to the FASSE Cluster you must use the FASSE VPN. It is different from the VPN you would use to connect to the FASRC Cluster and different from the HUIT VPN.
- Open the VPN app.
- Select Connect.

- In the dialog box that pops up, enter your username@fasse, for example, jharvard@fasse.
- Enter your password.
- Enter your 2-factor authentication code from your mobile app or from the desktop app.
- Select OK.
- You are now ready to connect to the connect to the cluster using either a Visual Interface or a Command Line Interface.

- Go to https://fasseood.rc.fas.harvard.edu
- Enter your FASRC username, without the “@fasse”, for example, jharvard
- Enter your FASRC password

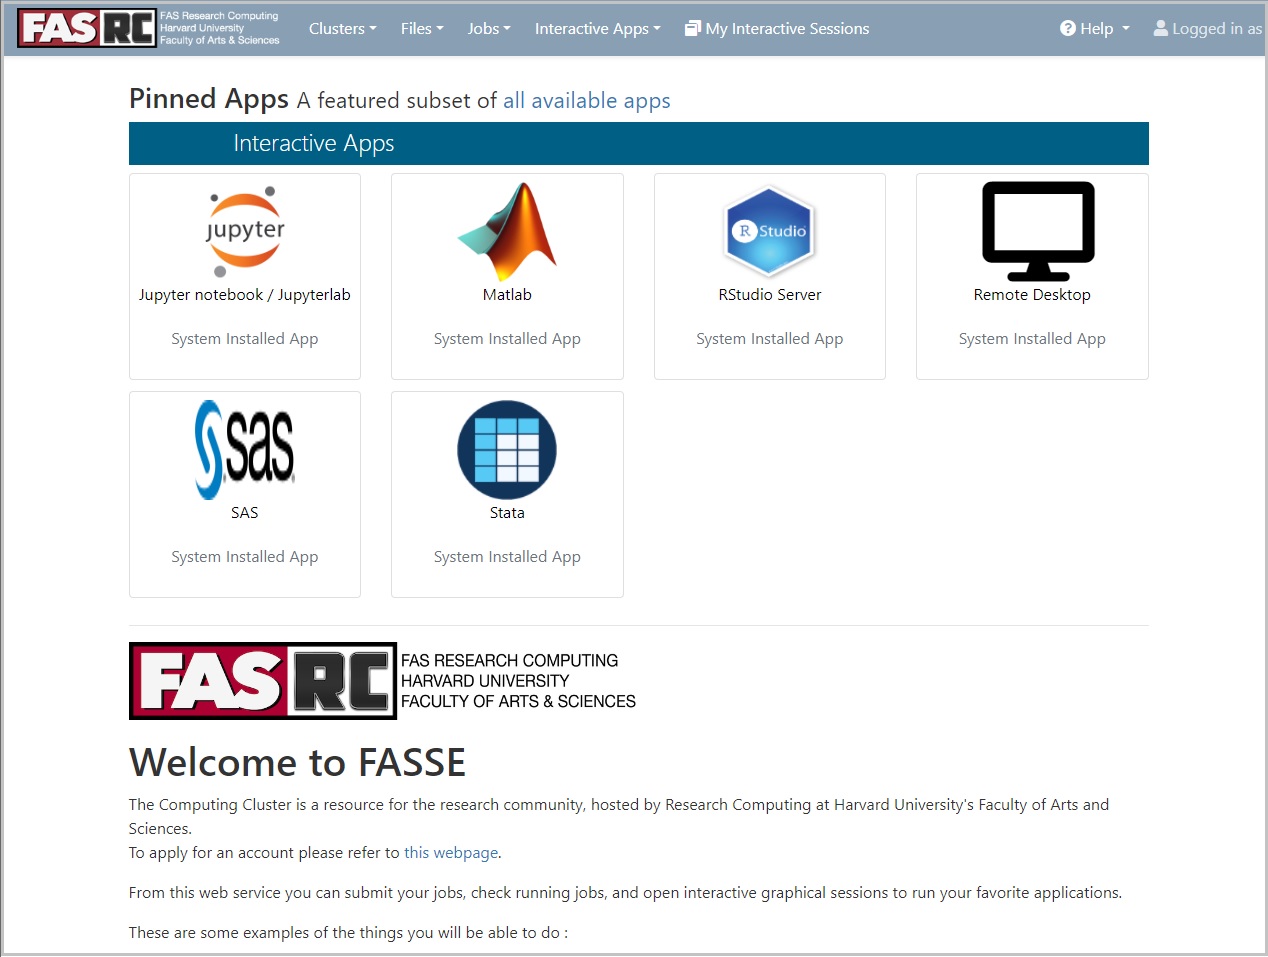
- Once you are logged in, this is what you will see:
- If you are using Linux or MacOSX, open a terminal. If you are on Windows, open a Command Prompt by clicking on the search icon and typing “Command Prompt.”
- Type the command ssh username@fasselogin.rc.fas.harvard.edu, for example ssh jharvard@fasselogin.rc.fas.harvard.edu.
- In the terminal window, login as username without @fasse, for example jharvard.
- Enter your password at the prompt.
- Enter your 2-Factor identification code when prompted for VerificationCode.

Bookmarkable Links
- 1 Step 1: Do I Qualify for an Account?
- 2 Step 2: New Account Sign-up Information
- 3 Before You Begin
- 4 Using the Account Request Tool
- 5 Instructions for the First Page: “New Account Request”
- 6 Instructions for the Second Page: “User Info”
- 7 Instructions for the Third Page
- 8 Services Tab
- 9 Instruments Tab
- 10 Step 3: Setting Your Password
- 11 Step 4: Set up OpenAuth 2-Factor Authentication
- 12 Setting Up 2-Factor Authentication in 1Password Password Manager
- 13 Setting Up 2-Factor Authentication on Your Mobile Device
- 14 Setting Up 2-Factor Authentication on Your Desktop
- 15 Step 5: Download Cisco AnyConnect [VPN Client]
- 16 Step 6 (for FASRC): To Connect to the FASRC (AKA Cannon) Cluster
- 17 Connect to the FASRC VPN
- 18 To Use a Command Line Interface
- 19 To Use a Visual Interface
- 20 Step 6 (for FASSE): To Connect to the FASSE Cluster
- 21 Connect to the FASSE VPN
- 22 To Use a Visual Interface
- 23 To Use a Command Line Interface
