Search Docs by Keyword
Globus File Transfer
Overview
Globus is a service enabling file sharing with external collaborators without requiring them to have accounts on FAS Research Computing systems. A collaborator has to use their Globus account login and their Globus shared collection, while a FAS Research Computing user has to follow the steps described in this document to gain access to the Globus service.
Globus is a third-party service that FASRC and other universities use as a nexus to share and transfer data from/to their filesystems. It is not run by FASRC.
For more information about Globus, watch What is Globus? from the Globus Team.
Self-paced course
This documentation is also available as a self-paced course on Canvas.
Collections: Harvard FAS RC Holyoke or Boston
FAS RC has four collections (or endpoints) based on data centers and data security level
- “Harvard FAS RC Holyoke”: for lab shares located in the Holyoke data center
- “Harvard FAS RC Holyoke Secure”: for lab shares with data security level 3 located in the Holyoke data center
- “Harvard FAS RC Boston“: for lab shares located in the Boston data center
- “Harvard FAS RC Boston Secure“: for lab shares with data security level 3 located in the Boston data center
Available storage
Almost all FASRC storage options are available through Globus, with the caveat of “Available folders” below. Data security level 3 storage shares are not automatically added to Globus.
Home directories are not and will not be added to Globus under any circumstances. Sharing home directories creates a security vulnerability, as authentication keys/passwords may be shared inadvertently. Therefore, home directories cannot be shared via Globus.
Available folders
Globus can only see the folders (or directories) Lab and Users/$USER — as of 2025, the Users folder has been deprecated. When using Globus, any folder must be inside Lab or Users/$USER. Anything outside Lab and Users/$USER, such as Everyone and Transfer, is not available through Globus.
If you find that your lab share is not seen by Globus or these sub directories don’t exist in your lab’s share, in the Holyoke or Boston collections, please contact us.
Important notes
- You can share many things, but be careful, don’t share more than what you should.
- Symlinks do not work in Globus
- To share files in various directories, you should create a parent directory and copy the various directories to the new parent directory.
- Read Tips for using tar to archive data documentation before tarring your data
- Globus will use your FASRC account’s permissions the same way you would if you were accessing your lab storage from a node on the cluster. This dictates what Globus can see and not see when inside the Globus File manager. Therefore:
- You need read access to the file and directory to transfer files out
- You need write access to the directory to copy files in
- See Globus limits
Globus login
For how to log in to Globus, watch the video or go through the steps below.
- Go to Globus.
- In the top right corner, click on “Login”.
- In the organizational login page, select “Harvard University.”
- Log in with HarvardKey. After logging in, you will land on Globus File Manager page.
If you are unable to complete this step, please contact HUIT to ensure your HarvardKey is current/enabled. - In the Globus file manager page:
- Collection (or endpoint): FAS RC has four collections based on data centers
- “Harvard FAS RC Holyoke” for lab shares located in the Holyoke data center
- “Harvard FAS RC Holyoke Secure” for lab shares with data security level 3 located in the Holyoke data center
- “Harvard FAS RC Boston” for lab shares located in the Boston data center
- “Harvard FAS RC Boston Secure” for lab shares with data security level 3 located in the Boston data center
- Type one of these names based on the storage location.
- Click the Collection, and you will be asked to authenticate your FASRC account.
- Click Continue.
- Log in with FASRC username and Token (FASRC two-factor authentication with 6 digits)
- In the “Path” bar, type the storage location that you would like to access it.
- Collection (or endpoint): FAS RC has four collections based on data centers
If you have difficulty connecting at any point in the process, connect to the RC VPN and try again, as certain steps require connectivity to our internal networks.
Transferring data with Globus
Step 0: Prerequisite knowledge
If your data contains directories with hundreds or thousands of files, you will need to tar those directories up into subset files. (Type man tar at the command line to view the manual page for tar.)
Too many files in a single directory, while generally never a good idea, will cause Globus to go into a ‘endpoint is too busy’ state and your job will timeout, restart, timeout, etc.
- The file will transfer more quickly, especially if the transfer is interrupted
- The file will be smaller if it needs to be retrieved from Tape
We highly recommend carefully reading the Tips for using tar to archive data documentation before tarring your data.
In this example, we show how to transfer files to/from your folder and an external collaborator’s Globus shared collection
- You should have received an email or link from your collaborator
- Open the link in a web browser (e.g., Chrome, Firefox)
- Select the files to transfer
- Specify the transfer settings
- Initiate the transfer by clicking on the large arrow icon
The How To Share Data Using Globus tutorial shows, step-by-step, how to share out a subfolder by first creating a Guest Collection and authorizing a collaborator’s Globus account to access your shared Guest Collection. Below is a summary of the steps. For more details, we recommend going by the step-by-step instructions in How To Share Data Using Globus.
Note that this works regardless of the collaborator’s affiliation with FASRC. An external collaborator without an FASRC account and with a Globus account can transfer to/from your shared Guest Collection.
- Get your collaborator’s Globus account
- Go to Globus File Manager
- Select the files to share
- Click on the “Share” icon (or right-click and select “Share”)
- Click on “Add Guest Collection”
- Fill in the information for the new Guest Collection
- Click on “Create Collection”
If you see an error containing the message “This operation requires a token with the following scopes:…”, click the “Continue” button, then select the link for your <username>@globus.rc.fas.harvard.edu Globus identity, re-authenticate with your FASRC username and token, and click “Create Collection” again. - In the “Permissions” tab, click on “Add Permissions — Share With”
- Share with the collaborator account
- The collaborator will receive a notification email
- Collaborator will then be able to initiate file transfers to/from your shared collection
Example 3: Transfer to/from a laptop or desktop
In this example, we show how to transfer files to/from a laptop or a desktop machine to/from FASRC.
- Set up a Mapped Collection on it by installing Globus Connect Personal software
Note: Premium Globus account is not required to transfer files between an institutional (FAS RC) shared collection and the Globus Connect Personal created collection. - Once the installation is finished, go to Globus File Manager
- Find your newly created collection in the “Your Collections” tab
- Select files to transfer
- Specify the transfer settings
- Initiate the transfer by clicking on the large arrow icon
Note: Make sure the Globus Connect Personal app is running and connected to the internet whenever you are transferring files. If you lose internet connection, the transfer will be paused and can be resumed at a later time.
Example 4: Transfer files within FASRC from one storage to another
In this example, we show how to transfer files from holylabs to netscratch. If you would like to use a different storage, such as group storage to/from netscratch, this example is analogous (you need to find where the filesystem is located, in the Holyoke or the Boston datacenters –see item 5a in the Globus login section). Globus is not recommended for transfers in the same filesystem (e.g. from a folder in holylabs to a different folder in holylabs).
- Go to the Globus file manager
- In the top-right corner, select the two-pane mode (middle icon)

- In the left panel, set
- Collection: Harvard FAS RC Holyoke
- Path:
/n/holylabs
- Then browse to the file that you would like to transfer
- In the right panel, set
- Collection: Harvard FAS RC Holyoke
- Path:
/n/netscratch
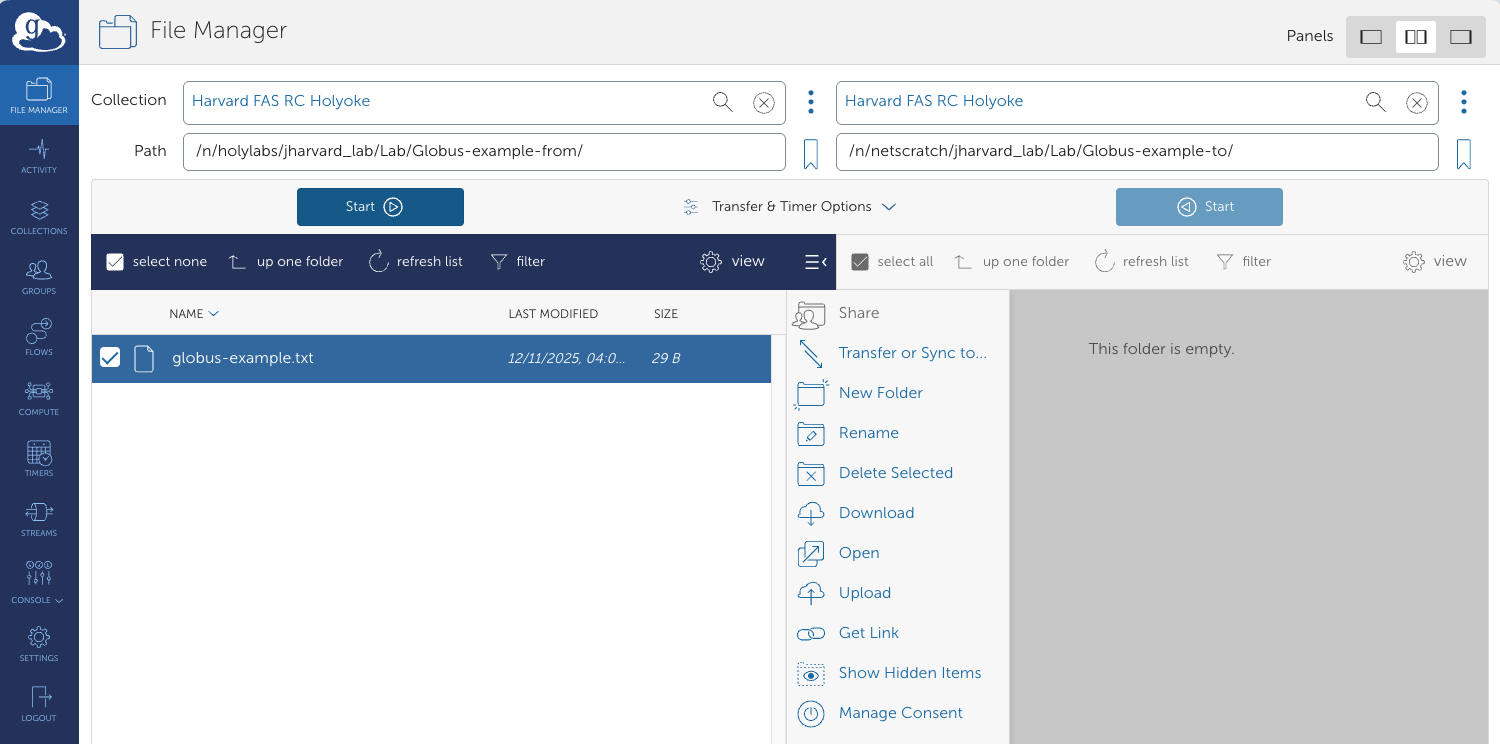
- Then browse to the file that you would like to transfer. Below, we transfer the file “globus-example.txt”
- Left panel path (source):
/n/holylabs/jharvard_lab/Globus-example-from - Right panel path (destination):
/n/netscratch/jharvard_lab/Globus-example-to
- Left panel path (source):
- On the left panel, click on the blue “Start” button
- The file should appear in the right panel. If not, click the “refresh list” button
Tips and tricks
Transfer and Timer Options
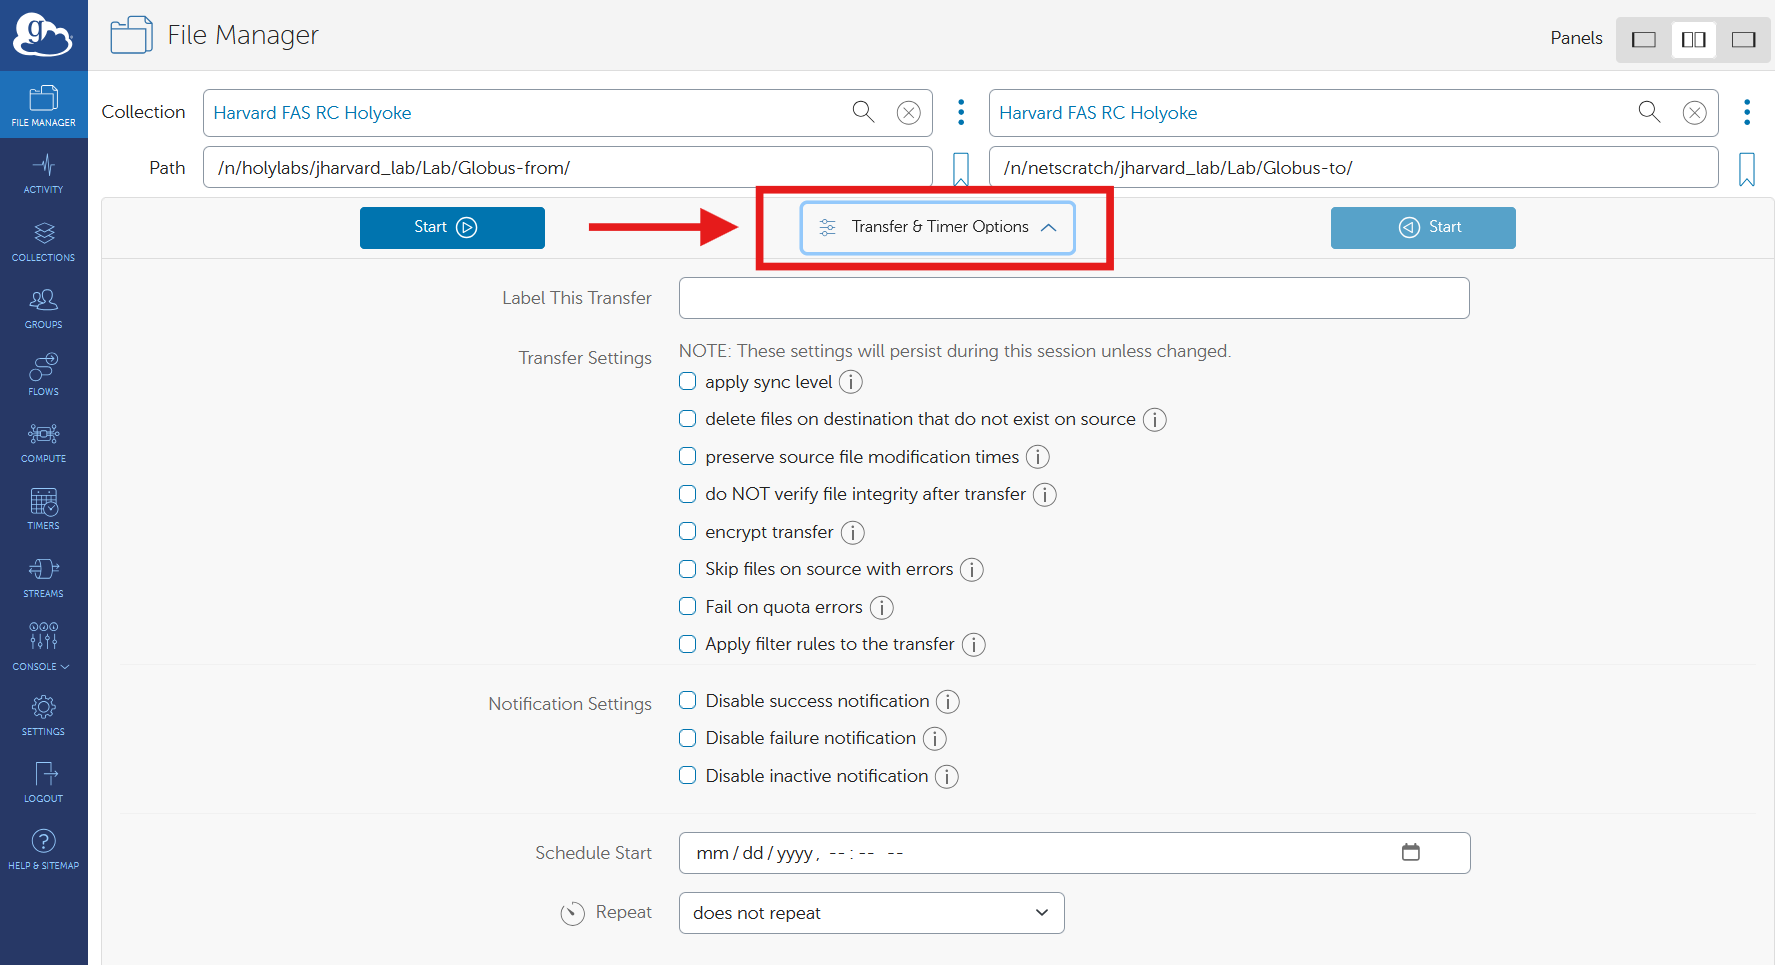
Globus has many options under the “Transfer and Timer Options”. Some options include:
- Preserve source file modification times
- Do NOT verify file integrity after transfer
- Encrypt transfer
- Fail on quota errors
You can also click on the “Information” icon for more details. To see all options:
- Go to the Globus file manager
- In the top-right corner, select the two-pane mode (middle icon)
- At the center, click on “Transfer and Timer Options” down arrow
Validate your transfer
Globus validates the transfer by default. You can choose to not validate by going to the “Transfer and Timer Options” -> “do NOT verify fie integrity after transfer”.
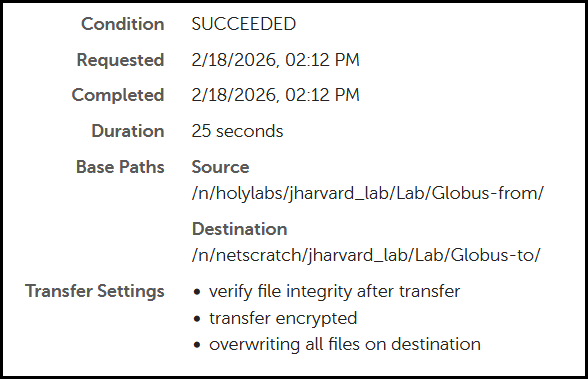
You can check if a finished transfer was validated by going to
- On the left menu, click Activity
- Click on the transfer that you would like to see
- In the “Overview” tab, at the bottom, see “Transfer Settings”. It should say all the settings that were selected or defaulted to. For example:
Installing Globus Connect Personal on your computer
To share data from or to your local machine with other Globus users (not just with FASRC), you can install and run a Globus Connect Personal on your computer.
- Install, Configure, and Uninstall Globus Connect Personal for Mac OS X
- Install, Configure, and Uninstall Globus Connect Personal for Windows
- Install, Configure, and Uninstall Globus Connect Personal for Linux
Using Globus With Tier 3 Tape
Please see the Globus: Transfer Data to Tape documentation.
Globus Docs and Videos
Bookmarkable Links
- 1 Overview
- 2 Globus login
- 3 Transferring data with Globus
- 3.1 Step 0: Prerequisite knowledge
- 3.2 Example 1: Transfer to/from a collection shared by a collaborator
- 3.3 Example 2: Share a subfolder that you own on FASRC with a collaborator
- 3.4 Example 3: Transfer to/from a laptop or desktop
- 3.5 Example 4: Transfer files within FASRC from one storage to another
- 3.6 Tips and tricks
- 4 Installing Globus Connect Personal on your computer
- 5 Using Globus With Tier 3 Tape
- 6 Globus Docs and Videos