Search Docs by Keyword
Connecting to the FAS RC VPN from Linux clients
We recommend using openconnect to connect to the Research Computing VPN from Linux.
First, install OpenConnect on Ubuntu/Debian or Fedora/CentOS or Arch Linux, respectively:
- Ubuntu/Debian: sudo apt-get install network-manager-openconnect-gnome
- Fedora/CentOS: sudo dnf install NetworkManager-openconnect
- Arch Linux:
Second, install a vpnc-script if you do not already have vpnc installed and it was not included with your installation of OpenConnect
- Ubuntu/Debian: sudo apt-get install vpnc-scripts
- Fedora/CentOS: sudo dnf install vpnc-script
- Arch Linux:
Find the script and make sure the script is executable. For example:
- sudo chmod u+x /etc/vpnc/vpnc-script
OpenConnect may be configured to use a default location for vpnc-script. If it does not find it, you can specify the script’s location:
- openconnect --script /etc/vpnc/vpnc-script[use the location on your system] https://vpn.rc.fas.harvard.edu/
Option 1: The NetworkManager GUI
- NOTE: If you prefer to connect using the command line, see “Using OpenConnect from command line” at the bottom of this page after installing OpenConnect.
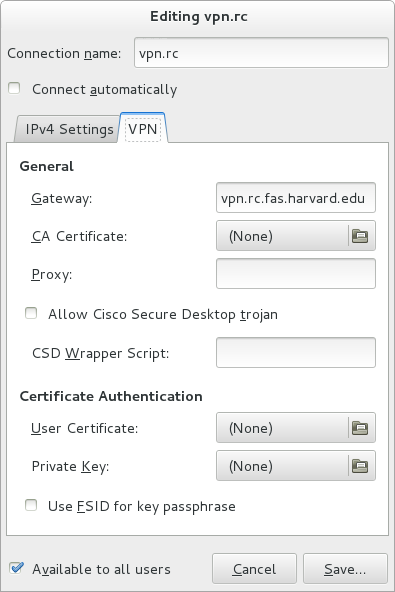
Under your network settings, add a VPN connection and specify vpn.rc.fas.harvard.edu as your gateway:

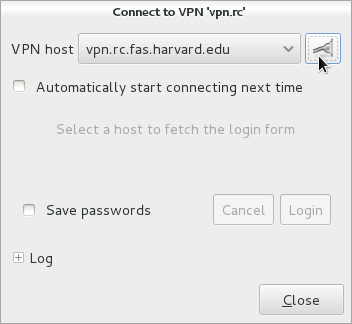
Turn on your VPN connection to bring up the connect dialog:

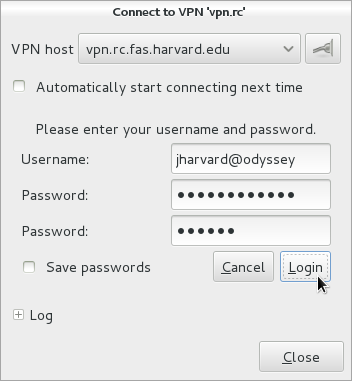
In the “Username” field, be sure to append “@fasrc” (the VPN realm).
Enter your password and 6 digit verification code:

You should now be connected to the RC VPN.
Option 2: CLI and Build from Source
If you don’t use NetworkManager, need a different version of the software, or otherwise don’t have success with the above, you can try building oath-toolkit and openconnect from source and using them from the command line. The following scriptlets build each under its own prefix in /opt/src and install each under its own prefix in /opt; adjust accordingly if you want to use other locations.
Build oath-toolkit
You will need the distro version of xmlsec, xmlcatalog, etc. On Ubuntu, make sure you have installed (at least) xmlsec1, libxmlsec1, libxmlsec1-dev, and libxml2-utils.
The installation is a very straighforward GNU-toolchain-style build; the following just embellishes it with some automation. Version 2.4.1 is the latest at the time of writing; newer may work better.
SW=/opt

SRC=$SW/src

cd $SRC

umask 022

wget --no-clobber http://download.savannah.gnu.org/releases/oath-toolkit/oath-toolkit-2.4.1.tar.gz

tar xvf $(basename $) APP=$(basename $ .tar.gz)

cd $APP

./configure --prefix=$SW/$APP

make

sudo make install
Create /opt/oath-toolkit-2.4.1/setup.sh with the following content:
Build openconnect
On Ubuntu, make sure you have installed (at least) vpnc and gettext.
The installation is a very straighforward GNU-toolchain-style build; the following just embellishes it with some automation. Note that we found that version 5.99 does not compile easily on Unbutu 14.04. Version 5.03 is the next-to-latest at the time of writing.
source /opt/oath-toolkit-2.4.1/setup.sh

SW=/opt

SRC=$SW/src

cd $SRC

umask 022

wget --no-clobber ftp://ftp.infradead.org/pub/openconnect/openconnect-5.03.tar.gz

tar xvf $(basename $)

APP=$(basename $ .tar.gz)

cd $APP

./configure --prefix=$SW/$APP --with-vpnc-script=/etc/vpnc/vpnc-script

make

sudo make install
Create /opt/openconnect-5.03 with the following content:
After installing OpenConnect, you can connect to the VPN via the command line using:
sudo openconnect -s /usr/share/vpnc-scripts/vpnc-script vpn.rc.fas.harvard.edu Then provide:
Using OpenConnect from command line with auto token generation
Put your openauth (the 15-character alphanumeric string shown on your personalized OpenAuth download page) secret in a file such as ~/.s and make sure only you can read it (e.g. chmod 600 ~/.s). Run the following, replacing USERNAME appropriately:
source /opt/oath-toolkit-2.4.1/setup.sh

source /opt/openconnect-5.03/setup.sh

openconnect --user USERNAME@fasrc --token-mode=totp --token-secret=base32:$(cat ~/.s) --background vpn.rc.fas.harvard.edu
- NOTE: If you get a Permission Denied error, you need to use sudo: sudo openconnect –user USERNAME@fasrc –token-mode=totp –token-secret=base32:$(cat ~/.s) –background vpn.rc.fas.harvard.edu You will then need to type your computer password (not your RC password) at the [sudo] password for xxxxxx: prompt.
You should then see the connection being negotiated and will be prompted for your RC password:
After that you should be connected to the VPN. Leave the window open. You can terminate the session at any time by going back to the window and pressing Ctrl+C
